Popular Posts

Friday, November 26, 2010

How To Set a Video as Desktop Background

How To Set a Video as Desktop Background

Do you want to set a Video as your desktop background instead of wallpaper ?
Its very simple to impress your buddies by doing so... If you want set a video background, just follow this simple steps:-

1. First of all you need a VLC player installed in your OS to perform this task. If not than download the VLC player from internet and install it.

2. Run VLC media player,go to Settings->preferences->Interface->Main interfaces,then click on wxWidgets.Remove the tick on "Taskbar" and put a tick on "Systray icon".

3. Now go to Video ->Output Modules->DirectX.On the bottom right put a tick on advanced options check box.You will now see some options.Put a tick on "Enable Wallpaper Mode ".

4. Now,select playlist and put a check or tick on "Repeat current item ".

5. Press the Save button.Now close the Vlc player and run it again(to save the settings permanently).

6. Now play any video you would like to set as Wallpaper.Right click on the video and click on "Wallpaper".The video would be set as your wallpaper

How to charge Mobile without a Charger

How to charge Mobile without a Charger

switch off Ur mobile, Remove battery, Fold a paper and keep it in such a way that it hides the center pin of the phone and then put the battery in. Now switch on. the display will say insert sim, next it will restart, then U pull the paper in the center pin..
HURRAY
Now the charge is full....
The concept is that there is a battery inbuilt in the phone and when we do this the centre pin is grounded and the full charge of the internal battery is transferred to the normal battery so We get full charge..
Next time when we charge, we need to charge for a long time, Including for the internal battery...

Its 100% tested, safe and working...

IT CAN BE USED AT SITUATIONS AT WHERE WE ARE GOING ON VACATION WITHOUT CHARGER AND THE CHARGE IS LOW...

How to Select Motherboard

the following advises are based on many years of experience. They are provided as a free service to our customers and visitors. However, Computer Warehouse is not responsible for any damage as a result of following any of these guides.


If you are building a new system we highly recommend going with a CPU and the motherboard that is of current technology such as, the AMD Athlon 64 or the Intel Pentium 4 (LGA775), in order to maintain an upgrade path. Once you know what form factor you are going to use you must make sure that the motherboard you are going to use supports the bus speed of your processor or higher. For instance, if you were buying an Intel Pentium 4 processor with a 533MHz bus it doesn’t make sense to buy a motherboard that only supports a max bus speed of 400MHz.

The reliability of motherboard as measured by return rates is roughly correlated with the price you pay. As a rule of thumb: the higher the price the better the reliability. We suspect that the manufacturers who have higher profit margins do more extensive testing and quality control before shipping. Therefore, we suggest that you buy a motherboard of the highest price your budget can afford. It is not easy to replace a motherboard, even for professional technicians. Besides, if the motherboard is bad, your whole system is likely to be in jeopardy.

On the other hand, motherboards do not have any moving, consumable parts. If they go bad, most often they do so within a month. If you can take your chances and are willing to learn how to replace a motherboard, the less expensive motherboards are just fine for budget minded buyers.

Buy current but proven technology. Purchasing yesterday’s technology can mean greater difficulty or limitation in future upgrades. For example, it doesn’t make sense to buy a Socket 478 motherboard anymore, since Intel stopped making Socket 478 processors when they reached the 2.4GHz speed. Socket 478 processors are now starting to become rare and their performance is lacking compare to newer Socket LGA 775 versions.

WARNING: Changing a motherboard from one type to another with different BIOS/chipset usually requires reinstallation of your operating system, particularly under Windows 9x. This happens because Windows 9x is designed to be “smart” enough to recognize some hardware; however, once it is set you can’t change it easily. This can be an upgrade nightmare if you are not prepared for it. Be prepared to do a full operating system install/re-install when you change a motherboard!

Regarding chipsets: The chipset is what makes your motherboard work. Different chipsets support different things, and have different integrated features. Chipset companies are usually very competitive, especially third party ones such as nVIDIA, VIA and SiS. In general the newer a chipset is for a given series of processors, the better the performance will be. However, the first few motherboards with a brand new chipset are more likely to have problems then motherboards produced later on. Often these sorts of problems are cleared up through patches, bios updates, and other fixes but it can be disappointing to get the latest, hottest new motherboard on the market and then find out it doesn’t like part x due to a bios problem after you install the board. The saying goes: “If you stay on bleeding edge, then you are likely to bleed.” The best thing to do is to research the motherboard you are interested in at the manufacturer’s website and at popular review website. It usually isn’t a good sign if the motherboard manufacturer does not have at least one bios update available. Also, motherboard manufacturers learn from the mistakes of their rivals and from their own previous mistakes. The third or fourth motherboard that hits the market using a new chipset is less likely to have problems than the first one to hit the market.

To integrate or not to integrate? Integration is a current industry trend. It saves cost and space to integrate as many components onto the motherboard as possible such as video, audio, modem, and network card. Integrated motherboards tend to have limitations on future upgrade ability and expandability. It is not recommended for power users. It may however serve first time and budget-minded buyers and as a second machine as well. The reliability of integrated motherboards have improved significantly in recent years, although the chances for something to go wrong on an integrated motherboard is still higher than a non-integrated one.

Convenience factor: If you are familiar with or have a large installation base with one brand/model of motherboard, staying with the same brand may help you minimize the number of manuals to keep. If nothing else, you want to keep your motherboard manual for as long as possible in the event of a problem with the manufacturer. Motherboard manufacturers now usually offer downloadable versions of their manuals online in order to assists their customers and to provide a way to correct errata. However, some manufacturers have been known to change the features on a motherboard without changing motherboard model. This creates problems later on if you have to download a manual, as the motherboard you have may be different than the revised one that manual is meant for.

If volume matters to you, guess who is by far the number one motherboard manufacturer in sales? Intel. Their volume comes mainly from OEM channels! Asus and Gigabytes/MSI are in second and third places.

DNS Tips and Tweaks

DNS Tips and Tweaks

Trying to find the fastest DNS for your computer? A friend of mine discovered the method on how to find the fastest DNS for a computer for a faster internet experience.

Wikipedia (en.wikipedia.org) explains that the Domain Name System (DNS) is a hierarchical naming system for computers, services, or any resource connected to the Internet or a private network. It serves as the "phone book" for the Internet by translating human-friendly computer hostnames into IP addresses.

The fastest DNS is essential for users to be able to browse websites and blogs effectively and error-free.

Here's how to find the fastest DNS for your computer.

* Download namebench:
Code:
http://code.google.com/p/namebench/downloads/list
- namebench is a free, open-source bench mark utility that hunts down the fastest DNS servers available for your computer to use.
- namebench runs on Mac OS X, Windows, and UNIX, and is available with a graphical user interface as well as a command-line interface.

Before You Install This You Must Update Your Microsoft Visual C++ 2008 SP1 Redistributable Package (x86) In Order to Run It!
Update here:
Code:
http://www.microsoft.com/downloads/en/confirmation.aspx?familyId=a5c84275-3b97-4ab7-a40d-3802b2af5fc2&displayLang=en
* Double click the downloaded executable file to extract namebench. No worries at all
- It's clean having scanned it with Eset NOD32;
- It's standalone, does not modify the operating system in any way.

* In the namebench GUI, Click 'Start Benchmark'.

The recommendations will be displayed once all servers have been tested.

30 Registry Tricks for Win XP

30 Registry Tricks for Win XP


Registry hints which can help you but please try it at your risk!


Here are some registry tricks which you can tryout... :

1. Disable the Autorun Option in your CD Rom Drive:
Open your Registry and navigate to "HK_L_M\system\currentcontrolset\services\cdro m"
Change the value of 'Autorun', or create a new DWORD value if it doesn't already exist, and set the value as '0' for Autorun disabled.

2. Disable the Harddisk Lowdiskspace warning in Windows Xp
User Key: "HKEY_CURRENT_USER\Software\Microsoft\Windows\ Curr entVersion\Policies\Explorer"
and
System Key: "HKEY_LOCAL_MACHINE\Software\Microsoft\Windows \Cur rentVersion\Policies\Explorer"
create a new DWORD 'NoLowDiskSpaceChecks' and change its value to '1'.

3. Disable the Windows Key
"HK_L_M\system\currentcontrolset\control\keybo ard layout"
Create a new Binary value, or modify the existing value called 'Scancode Map' as shown below.
Value: 00 00 00 00 00 00 00 00 03 00 00 00 00 00 5B E0 00 00 5C E0 00 00 00 00

4. View System BIOS Information
Open Registry and navigate to
"HK_L_M\hardware\de******ion\system"

5. Change the Title of Windows Media Player
"HK_C_USER\software\policies\microsoft\windows medi aplayer\"
Create a new string value called ' TitleBar' and change text as your wish.

6. Disable Internet access in Network
Open Registry and make the following changes
"KH_C_User\software\microsoft\windows\currentv ersi on\internetsettings\"
Change the value of "Proxyenabled" to 1 and change the value of "proxyserver" and set it to an ip address. Change the value of the ip address and port to "10.0.0.1:5555"

7. Disable the ability to Right click on the desktop
"HK_C_User\software\microsoft\windows\currentv ersi on\policies\explorer\"
Create a DWORD "NoViewContextMenu" and change its value to "0" for disabling and "1" for enabling.

8. Hide all items on desktop
"HK_C_USER\software\microsoft\windows\currentv ersi on\policies\explorer\"
and
"HK_L_M\software\microsoft\windows\currentvers ion\ policies\explorer\"
create a new DWORD "NoDesktop" and change its value to "1"
You can show all the items in the desktop by chaning the value to "0"

9. Disable the "Change Password" button in windows
"HKEY_CURRENT_USER\Software\Microsoft\Windows\ Curr entVersion\Policies\System"
and
"HKEY_LOCAL_MACHINE\Software\Microsoft\Windows \Cur rentVersi on\Policies\System"
Create a new DWORD "DisableChangePassword" and change its value to "0" for disabling and "1" for enabling.

10. Disable the "cancel" button or pressing the "Esc" key while logging on to Windows"
"HKEY_USERS\.DEFAULT\Software\Microsoft\Window s\Cu rrentVersion\Run"
Create a new string value "NoLogon" and change its value to "RUNDLL32 shell32,SHExitWindowsEx 0"

11. Remove "Log off" from start menu
"HKEY_CURRENT_USER\Software\Microsoft\Windows\ Curr entVersion\Policies\Explorer"
and
"HKEY_LOCAL_MACHINE\Software\Microsoft\Windows \Cur rentVersion\Policies\Explorer"
Create a new DWORD "NoLogOff" and change its value to "1" for disabling and "0" for enabling.

12. Clear the Recent playlist in Media Player
Navigate to "HKEY_CURRENT_USER\Software\Microsoft\MediaPla yer\ Player"
And clear the "RecentFileList" subkey.

13. Empty temporary Internet files on exit (in Internet Explorer)
"HKEY_CURRENT_USER\Software\Microsoft\Windows\ Curr entVersion\Internet Settings\Cache"
and
"HKEY_LOCAL_MACHINE\SOFTWARE\Microsoft\Windows \Cur rentVersion\Internet Settings\Cache"
Create a new DWORD "Persistent" and change the value to "0" for emptying and "1" to remove this option.

14. Clear the Internet Explorere typed addresses history
"HKEY_CURRENT_USER\Software\Microsoft\Internet Explorer\TypedURLs"
And delete the subkeys.

15. Remove recent documents from start menu
"HKEY_CURRENT_USER\Software\Microsoft\Windows\ Curr entVersion\Policies\Explorer"
and
"HKEY_LOCAL_MACHINE\Software\Microsoft\Windows \Cur rentVersion\Policies\Explorer"
Create a new DWORD "NoRecentDocsMenu" and change its value to "1".

16. Remove Network connections from start menu
"HKEY_CURRENT_USER\Software\Microsoft\Windows\ Curr entVersion\Policies\Explorer"
and
"HKEY_LOCAL_MACHINE\Software\Microsoft\Windows \Cur rentVersion\Policies\Explorer"
Create a new DWORD "NoNetworkConnections" and change its value to "1".

17. Remove My documents from start menu
"HKEY_CURRENT_USER\Software\Microsoft\Windows\ Curr entVersion\Policies\Explorer"
and
"HKEY_LOCAL_MACHINE\Software\Microsoft\Windows \Cur rentVersion\Policies\Explorer"
Create a new DWORD "NoSMMyDocs" and change its value to "1".

18. Remove My pictures from start menu
"HKEY_CURRENT_USER\Software\Microsoft\Windows\ Curr entVersion\Policies\Explorer"
and
"HKEY_LOCAL_MACHINE\Software\Microsoft\Windows \Cur rentVersion\Policies\Explorer "
Create a new DWORD "NoSMMyPictures" ad change its value to "1".

19. Remove My music fro start menu
"HKEY_CURRENT_USER\Software\Microsoft\Windows\ Curr entVersion\Policies\Explorer"
and
"HKEY_LOCAL_MACHINE\Software\Microsoft\Windows \Cur rentVersion\Policies\Explorer"
Create a new DWORD "NoStartMenuMyMusic" and change its value to "1".

20. Reboot windows after crash
"HKEY_LOCAL_MACHINE\SYSTEM\CurrentControlSet\C ontr ol\CrashControl"
Create a new DWORD "AutoReboot" and change its value to "1".Restart the machine for the effect to take place.

21. Disable the use of MSDos
User Key: "HKEY_CURRENT_USER\Software\Microsoft\Windows\ Curr entVersion\Policies\WinOldApp"
and
System Key: "HKEY_LOCAL_MACHINE\Software\Microsoft\Windows \Cur rentVersion\Policies\WinOldApp"
Create a new DWORD "Disabled" and set its value to "1". Change it to "0" for enabling.

22. Enable Directory completion in MSDos prompt
User Key: "HKEY_CURRENT_USER\Software\Microsoft\Command Processor"
and
System Key: "HKEY_LOCAL_MACHINE\Software\Microsoft\Command Processor"
Create a new DWORD "PathCompletionChar " and set it to equal the hex value of the required control character.

23. Quick edit the command prompt
User Key: "HKEY_CURRENT_USER\Console"
and
System Key: "HKEY_USERS\.DEFAULT\Console"
Create a new DWORD "QuickEdit" and set its value to "1" for enabling and "0" for disabling.

24. Disable Registry editing
"HKEY_CURRENT_USER\SOFTWARE\Microsoft\Windows\ Curr entVersion\Policies\System"
Create a new DWORD "DisableRegistryTools" and change its value to "0" for allowing Regedit and "1" for disabling it.

25. Disable task scheduler
" HKEY_LOCAL_MACHINE\Software\Microsoft\Windows\Curr entVersion\RunServices"
Delete the value from "SchedulingAgent". Usually its value is set to "'mstask.exe".

26. Remove My computer from desktop and start menu
User Key: "HKEY_CURRENT_USER\Software\Microsoft\Windows\ Curr entVersion\Policies\NonEnum"
and
System Key: "HKEY_LOCAL_MACHINE\Software\Microsoft\Windows \Cur rentVersion\Policies\NonEnum"
Create "{20D04FE0-3AEA-1069-A2D8-08002B30309D}" and change its value to "1" for removing. Change its value to "0" for showing.

27. Show Windows version on desktop
User Key: "HKEY_CURRENT_USER\Control Panel\Desktop"
Create a new DWORD " PaintDesktopVersion" and change its value to "1" for showing and "0" for removing.

28. Remove My documenst from desktop
Windows 95, 98 and Me
"HKEY_CURRENT_USER\Software\Classes\CLSID\{450 D8FB A-AD25-11D0-98A8-0800361B1103}\ShellFolder"
Windows NT, 2000 and XP
"HKEY_CURRENT_USER\Software\Microsoft\Windows\ Curr entVersion\Explorer\CLSID\{450D8FBA-AD25-11D0-98A8-0800361B1103}\ShellFolder"
Modify the value called "Attributes" as "0xf0500174" to hide or "0xf0400174" to show.

29. Disable Scan disk after improper shutdown
" HKEY_LOCAL_MACHINE\System\CurrentControlSet\Contro l\FileSystem"
create a new DWORD "DisableScandiskOnBoot" and change its value to "01" for disablng and "00" for enabling.

30. Automatically end Hung programs.
" HKEY_CURRENT_USER\Control Panel\Desktop"
and
"System Key: [HKEY_USERS\.DEFAULT\Control Panel\Desktop"
Modify the value of "AutoEndTasks" to "1".

Please try at your own risk!

easyest way to burn avi movies

this is the easyest way i know of burning avi's to DVD by using xtodvd
it's use's the drag and drop method
http://www.2shared.com/file/12319886...DVD_31018.html
alot of my freinds say that the newie versions dont allow them to play there burned dvds on ps3 xbow so they and me keep to this version also check settings for your region country etc etc (pal -euro) (usa ntsc )


Ms Config

THIS IS EASY BUT IT CAN BE HARM ALSO IF YOU DID MISTAKE OR PLAY WITH WIDOWS START UP...

HERE ARE STEPS TO DISABLE WHAT WE DON NEED IN START UP WINDOWS.
START >> RUN >>
TYPE >>> MSCONFIG >>> THEN HIT ENTER YOU WILL SE
SYSTEM CONFIGURATION UTILITY CONSOLE

CHOSE >>>> STARTUP <<<<
UNCHECK BOX OF STARTUP ITEMS WHICH U DON WANT WHEN WINDOWS IN ON STARTING PROCESS.


THEN CLICK OK AND RESTART WINDOWS....HAVE GOOD TIME.ENJOY

Tutorial How To Ripping 300MB MKV files from DVD


Tutorial How To Ripping 300MB MKV files from DVD
This guide is splitted into following parts:

1.) Setting up Encoder.
2.) Encoding.
3.) Editing of Output file

1.) Setting up Encoder

You Must Have Following 5 Files First

(a) Megui.

http://sourceforge.net/project/downl....exe&a=6828498
(b) Avisynth.
http://sourceforge.net/project/downl...exe&a=41520716
(c) Profiles.
http://rapidshare.com/files/204452745/allprofiles.rar
(d) Nero AAC Codec.
http://rapidshare.com/files/204452928/neroaac.rar
(e) Mkvtoolnix
http://www.bunkus.org/videotools/mkv....5.1-setup.exe

After downloading the above files follow these steps:

1. Install Megui, Avisynth and Mkvtoolnix.
2. Copy all 3 Nero AAC files to the Megui directory
By Default - "C:\Program Files\megui"
3. Run Megui and update it.
4. Close Megui.
5. Copy the "allprofiles" folder and paste it in Megui directory
By Default - "C:\Program Files\megui". Replace the allprofiles folder with new one.
6. Now run Megui and we are ready to encode some movies.
2.) Encoding

1. Run Megui and click file-->open and browse to the source video file.
2. Wait few seconds and then avisynth will open with video previewer (see images below).
3. Enter the desired output resolution (must be mod 16)*
*mod 16 resolution - Both height and width pixels must be completely divisible be 16. Example - Here 720x352 resolution is used and 720/16 gives remainder as 0 and also 352/16 gives rem. 0 so that means it's a mod 16 resolution.
4. You can crop screen if u see black borders (in our case we don't need it).
5. Click Save and you will be returned back to megui.
6. In video section select one video profile. For best result use "x264: HQ-Slow" or "x264: Unresteicted 2pass HQ".
7. Select file format as MKV.
8. In audio section select audio profile"Nero AAC: NDAAC-HE-64kbs".
9. Click config and check the "adaptive bitrate" and set it to @35kbps. You can also use 40kbps but 35kbps works fine for me.
10. Click "Auto Encode" and a new window will apppear.
11. Select conatiner as "MKV" and enter "average bitrate" as per the desired output file size (Remember 30minutes = 100mb). When done click "Queue".
12. Now click "Queue" tab at top of the encoder and click start
13. Now comes the most difficult part which is to wait. Encoding process has now begun so be patient. Time taken in encoding depends on many factors such as your pc's config., source's resolution, output file's resolution, o/p file size etc. On my pc a normal dvdrip takes an average time of 4-5 hours.

3.) TO EDIT MKV FILES I USE MKVMERGE.

In this section I will tell you how to:

(a) Add or remove subtitles.
(b) Making samples/splitting a file.
(c) Join files.
(d) How to sync. an mkv file.

but before that run mkvmerge.

(a) Add or remove subtitles.
Adding

1. Click "add" button to add a video file.
2. Now simply drag the subtitle file to the "tracks" box in mkvmerge or click the add button to add sutitle file.
3. Select output folder.
4. Click "start muxing".

Removing

1. Add your file.
2. Uncheck the subtitle file from the "tracks" box.
3. Select output folder.
4. Click "start muxing".

(b) Making samples/splitting a file
1.       Add the file that you want to split.
2. Now click "Global" tab at the top of the mkvmerge.
3. Tick the "enable splitting" option and choose the way* you want to split it.
*Take the cursor above each box for more info about it.

(c) Join files

Now if you want to join two or more splitted files into a single file then add the first part of file and then click "append" to add 2nd part and so on you can append a no. of files. Select o/p folder and click "start muxung".

(d) How to sync. an mkv file.

One common problem that arises after encoding a movie is that sometimes we gets file at output which is a bit out of sync. So, we can make it in sync using mkvmerge.
2.       Suppose that in our movie the sound is lagging beind video with duration 300ms. Then,
1. Add your file.
2. In "track" box click on video file and then "Format specific options". In "Delay (in ms)" enter 150.
3. Now in "track" box click on audio file and then "Format specific options". In "Delay (in ms)" enter -150.
4. Select o/p folder and click"start muxing"

Similarly, if video is lagging behind audio then in that case we would use -ve value for video file and +ve value for audio file.

This is how process goes:
Note: This guide has been tested for as per use on windows xp 32 bit and works. You may face some problems if you are using some other operating system. PLZ give your feedbacks about this tutorial and if you note some mistake then plz reply with it here.

Edit 1: If you have codec issues, remove any codecs you have installed and use the k-lite codec pack.

Wednesday, October 13, 2010

How to secure your password from hackers attacks

Today tip will help you to secure your computer from the access of professional hackers. There are some hacker’s breaks into your computer without using any impressive programming skills but trying to find words to guess as your password. Normally people use their name, house number, mobile number and word “password” as a password. If you have very simple password then a hacker can hack your computer very easily. To safe your computer from hackers there is a best way to create a tricky password. Here I will tell you some different type of tricks to make your password that can’t guess easily by any body.

Use the maximum characters in your password.

Always set the password using maximum characters length, because it is simple method, if your password is longer then it is very difficult to guess.

Use the combination of lower-case and upper case letters in your password.
Normally computer users use the lower case in password selection but it is best practice to use the combination of both (lower-case and upper case). So using different cases in your password makes it much more difficult to crack.

Use the combination of letters and numbers in your password.

When you mix both letters and numbers just like one letter and one number then your password is more incomprehensible.

Avoid using the name of your family members as password.

Always try to avoid the name of your child, spouse, city and country name as password, because if any body knows about your personal life’s details then they try to use these detail to guess your password.

Use any tools to create random password.

There are many third party tools are available to create the random password. You can create passwords containing a very difficult –to-guess collection of random characters with these tools.


never recieve any files from any person ( even from the known ,

because ,most pplz r hacked by known pplz )only u can recieve files

from trusted pplz

Never open any untrusted websites

Never add any unknown persons in ur yim.

Avoid P2P file Sharing Through Yahoo Messenger

Avoid downloading .exe or .zip files from unknown websites

Avoid Clicking on Spammy Links

Don't download Yahoo Plug-ins from Unauthorized source

etc etc 

MAKE A Bootable Windows XP

Make it clearer if u want make a disk that u can use it to boot windows/ or make a bootable cd use to install a new copy of windows...

Use nero express or daemon tools. but use nero w/c im using too.. if ur file is in ISO format simly double click the file and nero will pop-up.. if ur files isnt in ISO use this software to convert then burn it to cd/dvd


UltraISO Premium Edition v9.0 + patch

UltraISO is an ISO CD/DVD image file creating/editing/converting tool and a bootable CD/DVD maker , it can directly edit the CD/DVD image file and extract files and folders from it, as well as directly make ISO files from your CD/DVD-ROM or hard disk. At the same time, you can maintain the ISO bootable information, thus creating your own bootable CD/DVDs. You now have the power to make and edit your own ISO files, and then burn them to CD/DVD for your own needs.
UltraISO is in sole possession of the intellectualized ISO document format analyzer, it can process at the present time almost all types of image files, including ISO and BIN, it may even support new image files which are yet to be created. UltraISO can open these image files, directly extract files and folders, edit it and convert other image files to the standard ISO format.
UltraISO uses the double window unification user contact interface, you have the choice to only use the quick buttons and/or the mouse Drag & Drops, you can handle any CD/DVD image file easily.

Thursday, July 29, 2010

The fastest laptop processor on the planet

The fastest laptop processor on the planet.

Dominate and unleash your world of extreme gaming and multimedia by upgrading to the ultimate intelligent performance of laptops powered by Intel® Core™ i7 mobile processor Extreme Edition.

Control freaks, meet your revolutionary rig. Laptops with Intel Core i7 mobile processor Extreme Edition supports Intel® Extreme Memory Profiles (Intel® XMP) and Intel Mobile Iron City 1.3, the ultimate tuning utility making it simple to overclock and fine tune your mobile rig for incredible performance and battery life optimizations.²

Plus, with dual discrete graphics support, you'll experience the über performer for mind-blowing graphics on the go, so you can game in full living color and unprecedented realism.

Demolish mobile performance limits by upgrading to laptop PCs with Intel® Core i7 mobile processor Extreme Edition, designed from the ground up for revolutionary gaming performance and graphics on the go.

Blistering speeds unleashed and built in:

* Maximize speed for demanding applications with Intel® Turbo Boost technology³, accelerating processor clock speed up to 60% to match your workload.°
* Empower highly-threaded apps with the screaming fast multi-threaded performance of Intel® Hyper-Threading Technology (Intel® HT Technology).±
* Get double the memory bandwidth to enhance performance with integrated memory acrchitecture.∇
* Enjoy a 25% improvement in highly-threaded games with hardware-based technology that distributes artificial intelligence (AI), physics, and rendering across eight software threads.§

How to remove a password in Windows Vista

There may be occasions when you want to remove your password from Windows Vista.

For example, if another member of the family, or work colleague, was going to use your computer while you were away and you didn't want to divulge your password, although changing your password temporarily would be a better option in this case.

It is straight-forward to remove the Logon password requirement from Windows Vista, and takes only a few moments.

Find the "Remove your password" link in the User Accounts dialogue box and click on it, this opens the Remove your password dialogue box.

Enter your current password in the box provided, this stops any unauthorised removal, then click on the Remove Password button.

Thursday, July 8, 2010

How to know someone's IP Address [tutorial]

In many cases, it's desired to know the IP address of someone in the reconnaissance phase. The first question to ask is what information do I have about this person. In most cases it's possible that you have the email or IM of the target. First let's discuss the methods:

Method 1

if you have a web server hosted someplace where you can see its logs then it's very easy to send someone a URL of an image or any webpage hosted on your web server (http://123.123.123.123/veryfunnyimage.jpg) whenever this page is visited the web server keeps a log of who visited that page (IP address, time, browser, OS ... and lots of more info) where you can check later to collect IP addresses.


Method 2

sometimes people get freaked out from addresses that have ip addresses in the URL so having your webserver with a domain name would really help theperson you sent the URL to press on the link (www.mywebsite.com/veryfunnyimage.jpg)


Method 3

Some paranoid people don't open links to unknown sites. so here comes the cool trick. you can embed the image in a post of yours in a known site that allows HTML tags with image sources like < img src = (your image URL). in this case the URL you are going to send to the person is a link to a known website but the website contains another link to your web server. And whenever someone views this page on the known website, the "img src" link is invoked and voila!, you have a log entry on your webserver.


Method 4

Some Ultra paranoid people don't open links at all!! for these people I use my old trick. I send an email to the target that looks important to him (depending on the target actually and what's important to him). This email is in HTML format and contains a tag that links to an image on my webserver (probably a white image not to attract attention). Now upon merely opening the email, my webserver is invoked and a log entry is saved about the persons current IP address.


Note that this method only works if the email client allows images to be displayed (gmail disable that by default)

Method 5

A more faster approach is IM. If you have the IM of the target, then it's possible that you try to send him a file (not malicious, a picture or smthng). upon sending the file, a direct connection is established between you and thetarget. with a simple connection monitoring application (e.g.netstat on windows), you can know the Ip address.

Method 6

Some paranoid people don't accept files! so another trick in case of MSN is background sharing. the default for MSN is to accept backgrounds shared by others. Actually background sharing performs file sending if the background is not one of the default backgrounds. So the trick is to set your background for the IM to a cool pic from your computer and share it. if the default setting was not altered on yourtarget 's IM, then he will automatically accept it right away and a connection is opened. here comes again the connection monitoring app where you can identify the new connection and extract the IP add of thetarget.


Well those are one's that I used .. do you have any other methods ?? sometimes I only have the username on a forum or website. Any clues?

Method 7

In MSN messenger, if u don't have the display picture of the person you're talking to, the messenger will try to download it by default. this cause the the MSN to open a direct connection. Using a sniffing tool like wireshark will allow you to know the IP of the remoteperson .So basically if you don't have his display picture and you opened the chat window you'll get your log entry. You can either convince thetarget to change his/her display picture or you can remove the your local directory that caches the display pictures for all contacts (located in application data folder for the msn) to force the messenger to redownload the picture.

Monday, June 14, 2010

Prevent PenDrive Virus

Prevent Pen Drive Virus

:: Do the following ::

1) Disable autorun/autoplay function of your pen drive.

2) Now plugin your pen drive and open any folder of your computer.
(Do not open any folder from ur pen drive.)

3) Now goto tools then select Folder Option
In that box mark the Show Hidden Files & Folders option.
Also Uncheck Hide Extension for known file types & Hide Protected OS files.

Now click apply and ok buttons and close that folder.

4) Nome come to desktop.
On the Desktop, click on windows Start button and select Search for files & folders.

When the search dialog box appears on the screen, in that click on All Files & Folders, now click on More Advanced Options then select search Hidden files & folders.


Now go above & in Look In option, select your pendrive letter (For example E: Or G:)
and hit Enter.

5) Now if you see any unknown .Exefiles, simply delete them all.

another way 


just right click on ur desktop
then create a new winrar archiev
then open it
hi backspace n go 2 the pendrive via winrar
there u can see all hidden exe files ..delete the unknown 1s
u dnt even need 2 enable view hiden files
cause winrar shows them by default

Speed Up Google Chrome

Speed Up Google Chrome

Well Google lunched new version of Google chrome which is much faster and stable, You also loving it and it’s becoming your favorite browser as you simply loves it’s clean interface and speed of browsing. Here are some good tips which can improve your experience further and you will love this fantastic browser more than ever.

Just follow these tips and see how Chrome improves in performance -

Disables usage statistics of Google Chrome

This option is used to help in Development of Google chrome, It send your usage data to Google so that based on that they can further improve Chrome. But if you are worried about system performance you should disable it . To disable this go to tools menu > Options > Advanced and uncheck the check box which says Send usage data to Google….

Disable DNS Preload in Google Chrome

This will prevent Google chrome to keep DNS info in their cache. Most of time it is unnecessary if you have a good connection of at least 256kbps or more. It is recommended only for slow dial up connection or Mobile users who actually spend a lot f time in DNS query during browsing. to disable this select tools menu of Google Chrome and select “Options.” In the next window, go to the “Advanced” tab and uncheck the “Use DNS preload ….”


Disable anti-phishing filter

If you are advanced web user and you know how a phishing site look like or you know how to prevent from them you can disable this option. But if you are not at all comfortable working without phishing filters or don;t want to take risk you should keep it as it is . Disabling this not only saves your CPU time but also save your Internet bandwidth. This option can also be disabled from Tools Menu > Options > Advanced.

Removes navigational data regularly

All of the browsers cache the Navigation data and other info for faster access to web pages you frequently visit. But if your cache size is big or it contains very old pages which you hardly visit once or twice in a month it will start performing negative for you, as web pages will load faster but they Browsers perform worse when navigation data is saved. So it is important to remove navigational data frequently. To delete this in Chrome, go to Tools menu and choose the option “Remove navigation data” and choose “Delete data for this period” and not the option “All”. So it will remove old data and will keep recent data do this once in a week at least.

Disable Useless function which we don’t use normally


To options that are mentioned below you need to edit the properties of Chrome shortcut which you are using to start the browser. To Change it, right click on the Chrome icon and choose “Properties.” this will open a windows with the “Shortcut” tab, in this tab there is a box called “Destination”. You have to change things in this box itself.

E.g. To disable Java box,

if you are using Windows Vista it should go like this — : “C:Users\AppDataLocalGoogleChromeApplicationchrome .exe -disable-java”
and if you are using Windows XP: “C:Documents and Settings%username% Local SettingsApplication DataGoogleChrome.exe”
The options which we are adding after the full path of chrome can be used one after the other leaving a space between. You don’t need to write the entire path every time you are using a new options. Here are the option which can be used -

Disable-dev-tools – This will disable Developers tool which is not used by a normal user for sure.

Disable-logging – This will disable looging of browser activity, This log files are useful only in case of Crash or Other error which prevent you from using browsers. if you are experiencing any such problem and need to know the reason you can enable this option. but in general you don’t need these log files. By disabling this you will certainly save CPU RAM and Hard disk space.

Disable-metrics-system – This option will disable gathering of Usage Statistics data. This is used by Google and we don’t need it any how so you can safely disable this option.

Disable-metrics-reporting – If you disabled Metrics system there is no point in keeping Metrics reporting On, as there won’t be any data to send across. Disable it for sure.

Disable-java – Java on the web is rarely used these days and it greatly slow downs your browsers performance. If you not running any online application which uses Java or Java Applets you can safely disable this feature. This will prevent you from playing number of Online Java Games though. (like Yahoo Games)

Disable-java script – This will disable all kinds of JavaScript from being run on the web pages you visit. This is not recommended at all as most of the sites these days are using some kind of JavaScript, to display pages. By Disabling JavaScript you will not be able to see these site properly and they will behave improprly. This is why disabling JavaScript is not recommended.

Disable-plugins – This will disable all plugins including Flash player and other media player. After applying this modification you won’t be able to see a lot of media sites properly including YouTube. If you understand impact of disabling this go ahead and do it otherwise don;t use this option.

Disable-images – This will disable all images on all Webpages you browse, if you are using low bandwidth conection like GPRS or Dial Up it will be very useful for you as it will save a lot of bandwidth for you. This will make your browser an text only browser. So be sure you need it that way before making these changes.

Monday, May 31, 2010

List of the keyboard shortcuts that are available in Windows


Getting used to using your keyboard exclusively and leaving your mouse behind will make you much more efficient at performing any task on any Windows system. I use the following keyboard shortcuts every day:

Windows key + R = Run menu

This is usually followed by:
cmd = Command Prompt
iexplore + "web address" = Internet Explorer
compmgmt.msc = Computer Management
dhcpmgmt.msc = DHCP Management
dnsmgmt.msc = DNS Management
services.msc = Services
eventvwr = Event Viewer
dsa.msc = Active Directory Users and Computers
dssite.msc = Active Directory Sites and Services
Windows key + E = Explorer

ALT + Tab = Switch between windows

ALT, Space, X = Maximize window

CTRL + Shift + Esc = Task Manager

Windows key + Break = System properties

Windows key + F = Search

Windows key + D = Hide/Display all windows

CTRL + C = copy

CTRL + X = cut

CTRL + V = paste

Also don't forget about the "Right-click" key next to the right Windows key on your keyboard. Using the arrows and that key can get just about anything done once you've opened up any program.


Keyboard Shortcuts

[Alt] and [Esc] Switch between running applications

[Alt] and letter Select menu item by underlined letter

[Ctrl] and [Esc] Open Program Menu

[Ctrl] and [F4] Close active document or group windows (does not work with some applications)

[Alt] and [F4] Quit active application or close current window

[Alt] and [-] Open Control menu for active document

Ctrl] Lft., Rt. arrow Move cursor forward or back one word

Ctrl] Up, Down arrow Move cursor forward or back one paragraph

[F1] Open Help for active application

Windows+M Minimize all open windows

Shift+Windows+M Undo minimize all open windows

Windows+F1 Open Windows Help

Windows+Tab Cycle through the Taskbar buttons

Windows+Break Open the System Properties dialog box


acessability shortcuts

Right SHIFT for eight seconds........ Switch FilterKeys on and off.

Left ALT +left SHIFT +PRINT SCREEN....... Switch High Contrast on and off.

Left ALT +left SHIFT +NUM LOCK....... Switch MouseKeys on and off.

SHIFT....... five times Switch StickyKeys on and off.

NUM LOCK...... for five seconds Switch ToggleKeys on and off.

explorer shortcuts

END....... Display the bottom of the active window.

HOME....... Display the top of the active window.

NUM LOCK+ASTERISK....... on numeric keypad Display all subfolders under the selected folder.
NUM LOCK+PLUS SIGN....... on numeric keypad (+) Display the contents of the selected folder.

NUM LOCK+MINUS SIGN....... on numeric keypad (-) Collapse the selected folder.

LEFT ARROW...... Collapse current selection if it's expanded, or select parent folder.

RIGHT ARROW....... Display current selection if it's collapsed, or select first subfolder.


Type the following commands in your Run Box (Windows Key + R) or Start Run

devmgmt.msc = Device Manager
msinfo32 = System Information
cleanmgr = Disk Cleanup
ntbackup = Backup or Restore Wizard (Windows Backup Utility)
mmc = Microsoft Management Console
excel = Microsoft Excel (If Installed)
msaccess = Microsoft Access (If Installed)
powerpnt = Microsoft PowerPoint (If Installed)
winword = Microsoft Word (If Installed)
frontpg = Microsoft FrontPage (If Installed)
notepad = Notepad
wordpad = WordPad
calc = Calculator
msmsgs = Windows Messenger
mspaint = Microsoft Paint
wmplayer = Windows Media Player
rstrui = System Restore
netscp6 = Netscape 6.x
netscp = Netscape 7.x
netscape = Netscape 4.x
waol = America Online
control = Opens the Control Panel
control printers = Opens the Printers Dialog


internetbrowser

type in u're adress "google", then press [Right CTRL] and [Enter]
add www. and .com to word and go to it


For Windows XP:

Copy. CTRL+C
Cut. CTRL+X
Paste. CTRL+V
Undo. CTRL+Z
Delete. DELETE
Delete selected item permanently without placing the item in the Recycle Bin. SHIFT+DELETE
Copy selected item. CTRL while dragging an item
Create shortcut to selected item. CTRL+SHIFT while dragging an item
Rename selected item. F2
Move the insertion point to the beginning of the next word. CTRL+RIGHT ARROW
Move the insertion point to the beginning of the previous word. CTRL+LEFT ARROW
Move the insertion point to the beginning of the next paragraph. CTRL+DOWN ARROW
Move the insertion point to the beginning of the previous paragraph. CTRL+UP ARROW
Highlight a block of text. CTRL+SHIFT with any of the arrow keys
Select more than one item in a window or on the desktop, or select text within a document. SHIFT with any of the arrow keys
Select all. CTRL+A
Search for a file or folder. F3
View properties for the selected item. ALT+ENTER
Close the active item, or quit the active program. ALT+F4
Opens the shortcut menu for the active window. ALT+SPACEBAR
Close the active document in programs that allow you to have multiple documents open simultaneously. CTRL+F4
Switch between open items. ALT+TAB
Cycle through items in the order they were opened. ALT+ESC
Cycle through screen elements in a window or on the desktop. F6
Display the Address bar list in My Computer or Windows Explorer. F4
Display the shortcut menu for the selected item. SHIFT+F10
Display the System menu for the active window. ALT+SPACEBAR
Display the Start menu. CTRL+ESC
Display the corresponding menu. ALT+Underlined letter in a menu name
Carry out the corresponding command. Underlined letter in a command name on an open menu
Activate the menu bar in the active program. F10
Open the next menu to the right, or open a submenu. RIGHT ARROW
Open the next menu to the left, or close a submenu. LEFT ARROW
Refresh the active window. F5
View the folder one level up in My Computer or Windows Explorer. BACKSPACE
Cancel the current task. ESC
SHIFT when you insert a CD into the CD-ROM drive Prevent the CD from automatically playing.

Use these keyboard shortcuts for dialog boxes:

To Press
Move forward through tabs. CTRL+TAB
Move backward through tabs. CTRL+SHIFT+TAB
Move forward through options. TAB
Move backward through options. SHIFT+TAB
Carry out the corresponding command or select the corresponding option. ALT+Underlined letter
Carry out the command for the active option or button. ENTER
Select or clear the check box if the active option is a check box. SPACEBAR
Select a button if the active option is a group of option buttons. Arrow keys
Display Help. F1
Display the items in the active list. F4
Open a folder one level up if a folder is selected in the Save As or Open dialog box. BACKSPACE

If you have a Microsoft Natural Keyboard, or any other compatible keyboard that includes the Windows logo key and the Application key , you can use these keyboard shortcuts:


Display or hide the Start menu. WIN Key
Display the System Properties dialog box. WIN Key+BREAK
Show the desktop. WIN Key+D
Minimize all windows. WIN Key+M
Restores minimized windows. WIN Key+Shift+M
Open My Computer. WIN Key+E
Search for a file or folder. WIN Key+F
Search for computers. CTRL+WIN Key+F
Display Windows Help. WIN Key+F1
Lock your computer if you are connected to a network domain, or switch users if you are not connected to a network domain. WIN Key+ L
Open the Run dialog box. WIN Key+R
Open Utility Manager. WIN Key+U

accessibility keyboard shortcuts:

Switch FilterKeys on and off. Right SHIFT for eight seconds
Switch High Contrast on and off. Left ALT+left SHIFT+PRINT SCREEN
Switch MouseKeys on and off. Left ALT +left SHIFT +NUM LOCK
Switch StickyKeys on and off. SHIFT five times
Switch ToggleKeys on and off. NUM LOCK for five seconds
Open Utility Manager. WIN Key+U

shortcuts you can use with Windows Explorer:


Display the bottom of the active window. END
Display the top of the active window. HOME
Display all subfolders under the selected folder. NUM LOCK+ASTERISK on numeric keypad
Display the contents of the selected folder. NUM LOCK+PLUS SIGN on numeric keypad (+)
Collapse the selected folder. NUM LOCK+MINUS SIGN on numeric keypad (-)
Collapse current selection if it's expanded, or select parent folder. LEFT ARROW
Display current selection if it's collapsed, or select first subfolder. RIGHT ARROW

Stop Yahoo From Tracking You

Stop Yahoo From Tracking You

---------------------------------------

1. Go to the address

Code:: http://privacy.yahoo.com/privacy

and click the "Cookies" link under the "Special Topics" column.

2. Click the "Web Beacons" link under the "Reference Links" Column.

3. On this page, click the "click here to opt out" link toward the end of the third paragraph under the "Outside the Yahoo! Network" title.

4. After a while, a page that says you have been out of the monitoring program will load. Without doing anything, close that page or continue your usual surfing by typing another address in the address bar. (Do NOT click the "Cancel Opt-out" button, your action will be canceled!)

5. You're done! Now Yahoo! will not record what you're doing during surfing.

You can let your friends that might be interested know about this; since no matter how "innocent" it may seem, it's still a violation of privacy

Did you know that Yahoo now tracks every LINK or AD that a user MAY HAVE SEEN ON THE PAGE. They now accumulate 1 tetra-byte of data every 2 days

How to get rid of Restart Now/Restart Later

found this after a lot of Googling, so I'd like to share the solution. This may not be new or even advanced but it surely helped me...
Anyone who is running Windows XP SP2 knows about this. The most annoying, ill-designed dialog box ever invented in the history of the computers that asks "Updating your computer is almost complete. You must restart your computer for the updates to take effect. Do you want to restart your computer now?"


And there are only two options: Restart Now/Restart Later. "Restart Later" means that this thing will ask you again in 10 minutes. If you're willing to work for the next 4 hours until lunch before rebooting, this means you'll need to answer this question 24 times. It also steals the focus.

to get rid of it:

Start / Run / gpedit.msc / Local Computer Policy / Computer Configuration / Administrative Templates / Windows Components / Windows Update / Re-prompt for restart with scheduled installations

You can configure how often it will nag you (I re-configured it for 720 minutes, which means I'll be asked twice on a work day), or completely disable it.

a reboot is needed.Enjoi

Make your computer 3 times faster

Make your computer 3 times faster

This tUtorial will teach you how to increase your operating system speed 3 times faster.

this steps should be applied by either slow and fast computers. it will speed up your operating system surfing.

there are 28 easy steps. it might take a bit long to apply them all especially if you're not familiar with windows registry, but trust me it worth it.

Ok now here it goes..read carefully...coz i wont accept any questions about it...


1. Processor scheduling should be set to background services and not Programs.
Start > Settings > Control Panel > System > Advanced > Performance Settings > Advanced Tab > Background Services

2. Visual effects should be set to a minimum.
Start > Settings > Control Panel > System > Advanced > Performance Settings > Visual Effects Tab > Adjust for best performance


3. Switch Off Desktop Background Image
Right Click Desktop > Properties > Desktop Tab > Background None

4. Disable Screen Saver
Right Click Desktop > Properties > Screen Saver > None


5. Disable Fast User Switching
Start > Settings > Control Panel > User Accounts > Change the way users log on or off > Untick Use Fast User Switching

6. Switch Off Power Schemes
Start > Settings > Control Panel > Power Options > Always On > Turn off monitor and turn off hard discs to Never

7. Switch Off Hibernation
Start > Settings > Control Panel > Power Options > Hibernate > Untick Hibernation

8. Activate DMA on Hard Discs/CD ROMS
Start > Settings > Control Panel > System > Hardware > Device Manager > IDE ATA/ATAPI Controllers > Right Click Primary IDE channel and Secondary IDE channel > Properties > Advanced Settings Tab > Tra

9. Disable System Sounds
Start > Settings > Control Panel > Sounds and Audio Devices > Sounds Tab > Sound Scheme to None.

10. Do Not Map Through Soundcard
Start > Settings > Control Panel > Sounds and Audio Devices > Hardware Tab > (highlight your soundcard from the list) > Properties > Audio Devices > (highlight your soundcard from the list) > Properti

11. Disable System Restore
Start > Settings > Control Panel> System > System Restore Tab. Tick the "Turn off System Restore on all Drives"

12. Disable Automatic Updates
Start > Settings > Control Panel> System > Automatic Updates > Turn off automatic updating. I want to update my computer manually

13. Startup and Recovery Options
Start > Settings > Control Panel> System > Advanced > Startup and Recovery Settings > Untick Automatically Restart

14. Disable Error Reporting
Start > Settings > Control Panel> System > Advanced > Error Reporting > Disable Error Reporting

15. Disable Remote Assistance
Start > Settings > Control Panel> System > Remote > Untick Allow remote assistance invitations to be sent from this computer

16. Fix Swap File (Virtual Memory)
Start > Settings > Control Panel > System > Advanced > Performance Settings > Advanced > Virtual Memory Change > Custom Size. Set initial and maximum size to the same value

17. Speed Up Menus
Start > Run > Regedit > HKEY_CURRENT_USER > Control Panel > Desktop Folder. Set MenuShowDelay to 1

18. Disable Offline Files
Start > Settings > Control Panel > Folder Options > Offline Files Untick "Enable Offline Files"

19. Disable Remote Desktop
Start > Settings > Control Panel > System > Remote > Untick "Allow users to connect remotely to this computer"

20. Disable Internet Synchronise Time
Start > Settings > Control Panel > Date and Time > Internet Time > Untick "Automatically synchronize with internet time server"

21. Disable Hide Inactive Icons
Start > Settings > Taskbar and Start Menu > Taskbar TAB > Uncheck "Hide Inactive Icons"

22. Disable Automatic Desktop Cleanup Wizard
Start > Settings > Control Panel > Display > Desktop > Customise Desktop > Untick "Run Desktop Cleanup Wizard every 60 days"

23. Disable NTFS Last Access Time Logging (NTFS File Systems Only)
Start > Run > regedit > HKEY_LOCAL_MACHINE > System > CurrentControlSet > Control > Filesystem. Add a new DWORD value - "NtfsDisableLastAccessUpdate" and set value to 1.

24. Disable Notification Area Balloon Tips
Start > Run > regedit > HKEY_CURRENT_USER > Software > Microsoft > Windows > CurrentVersion > Explorer > Advanced. Create a new DWORD value called EnableBalloonTips and set to 0.

25. Disable CDROM Autoplay
Start > Run > regedit > HKEY_LOCAL_MACHINE > System > CurrentControlSet > Services > Cdrom. Set autorun to 0.

26. Disable Disc Indexing Service
Right Click Start > Explorer > Right Click Each Disc > Properties > Untick "Allow Indexing Service to index this disc for fast file searching"

27.Restart ur pc...enjoy!!!

GETTING RID OF MALWARE

GETTING RID OF MALWARE PERMANENTLY
If scanning with multiple antispyware programs doesn't remove it, try using Windows' System Restore feature (note that Windows 2000 lacks System Restore). Select Start, Programs (or All Programs), Accessories, System Tools, System Restore. Choose Restore my computer to an earlier time, click Next, pick the earliest Restore Point available on the displayed calendar, and follow the prompts.

Should System Restore fail to solve the problem, your next steps are to reboot your PC and press before your monitor switches resolution as Windows loads. At the resulting menu, select Safe Mode with a Command Prompt, and then pick your operating system. At the command prompt, type C:\windows\system32\restore\rstrui.exe, press , and try running System Restore from there.
If your PC is still infected after this, I must make like Dear Abby and recommend that you seek the assistance of a professional. Contact the support desks of your various security software vendors, one of which may have the solution.
try community approach, create a verus technical report on ur system's suspicious Windows behavior and post it on one of the the many web forums.
If all else fails, back up your data folders and get ready to reformat the PC's hard drive and restore your system from a full backup. If you don't have an image backup of your drive, you'll have to reinstall Windows, install and update your malware protection, and restore your data from the backup. See "Move All of Your Valuable Data to a New Partition" for a list of the folders that likely contain your data. Instead of moving the folders (as that tip suggests), copy them to CDs, DVDs, or an external hard drive.
Of course, reformatting and restoring your drive is easies

Speed UP ur Computer

Following these steps will increase the "speed" of your computer dramatically.

1)-- Clean up the disk. Uninstall unneeded programs (especially those that run at startup and/or put something in the system tray), run Disk Cleanup, and defragment the drive. This is a good first step that will almost always take a few seconds off boot time and application loads for any computer.

2)-- Stomp auto-starting programs. Click Start > Run and type "msconfig" at the prompt. Click the Startup tab and look at all that junk that loads when you launch your PC. Do you really need "Adobe Reader Speed Launch"? Probably not. Turn off anything else that looks useless, but be careful not to disable your anti-virus and important system components.

3)-- Run a full anti-virus and anti-spyware scan. I would recommend using AVG Free Anti-virus, Spybot - Search and Destroy spyware remover and Ad-aware spyware remover. These programs are all free.

4)-- Clean up the registry. CCleaner is free and worth running. It will also remove unused files from your system - allowing Windows to run faster and freeing up valuable hard disk space.

Those are the easy and free things you can do. If your computer is still slow you need to move on to the bigger guns.

1)-- Upgrade RAM. This is the one killer trick that will make almost any computer run faster. With an older PC, you will rarely have enough RAM to run today's memory-hogging operating systems and applications, and adding a high-capacity stick or two of quality RAM will give you a quick speed boost. Adding RAM is fairly simple, even for a novice, and you should be able to do the job in 5 or 10 minutes.You can run a free test at http://www.crucial.com and find out what kind of RAM (memory) your computer needs.

2)-- Reinstall Windows. If the above tricks haven't helped, it may be time to wipe the slate clean and start again, reformatting your hard drive, reinstalling your applications, and restoring your data files from a backup. You'd be surprised how much more responsive a freshly reinstalled Windows system can be, as you've wiped out years of temp files, garbled registry entries, old versions of software programs that have been upgraded repeatedly, and all sorts of other electronic junk. Reinstalling is easy if you have the "recovery disk" that came with your PC, and only a bit more involved if you're using a retail copy of Windows XP. Just be sure you back up everything you want to take with you before you pull the trigger!

3)-- Upgrade your hard drive. This is a more complicated solution, but if you're reinstalling Windows (per the prior tip) you might consider upgrading to a bigger and possibly faster hard drive, too. Hard disk storage is a performance bottleneck on every machine, and magnetic disks degrade over time. Some performance issues could be caused by a failing hard drive, even, and upgrading to a new model could really put some zip back in your system. As a bonus, you can use the original hard drive for backups or occasional storage, if you put it in an enclosure.

Tweek Bandwidth for XP

Increase XP network or adsl by 20%, A nice reg hack to Increase BROADBAND:

this ones simple:

this is for broad band connections. I didn't try it on dial up but might work for dial up.

1.make sure your logged on as actually "Administrator". do not log on with any account that doesn't have administrator privileges.
2. start - run - type gpedit.msc
3. expand the "local computer policy" branch
4. expand the "administrative templates" branch
5. expand the "network branch"
6. Highlight the "QoS Packet Scheduler" in left window
7. in right window double click the "limit reservable bandwidth" setting
8. on setting tab check the "enabled" item
9. where it says "Bandwidth limit %" change it to read 0

reboot and your all done.

Some simple Xp tips

1.Remove "Logoff" from the start menu >>

>> You might want to remove the "logoff" buton from the start menu if u never use it.this involves a registry tweak .go to the start menu , click "run" and type in "regedit". this will take u to the registry editor .Go to HKEY_CURRENT_USER\SOFTWARE\Microsoft\Windows\Curre ntVersion\Policies\Explorer.Right click in the right pane and create a new DWORD value .Name this value "StartMenuLogoff".Give it a value of "1" and restart your computer .'Logoff' will no longer be visible in the start menu.

2.Bypass The Rcycle Bin When Deleting Files >>

>> Right-click on the recycle bin and choose 'properties'.In the 'Global' tab, check the box that says"Do not move files to the recycle bin ..."That's it.No more taking out the garbage!

3. The 'Copy To..' And 'Move To..' context options >>

>> To add the 'Copy To..' and 'Move To..' context menu options, create the follwing registry keys: HKEY_CLASSES-ROOT\AllFilesyatemObjects\shellex\contextMenuHandl ers\ Copy To HKEY_CLASSES-ROOT\AllFilesyatemObjects\shellex\contextMenuHandl ers\ Move To
For 'Copy To', set the value to "{C2FBB630-2971-11d1-A18C-00C04FD75D13}", and for 'Move To', set the value to
"{C2FBB631-2971-11d1-A18C-00C04FD75D13}" .Henceforth, when you right-click on a file or folder, above the 'Send To' options,you'll see two new options-"Copy To Folder" and"Move To Folder".
Using this, you can copy or move files or directories to other folders.

4. REmoving the short cut sign >>

>> Shortcut icons have a small curved arrow in the lower-left corner. To remove this arrow:
1. Start the Registry Editor.
2. Locate the keys
HKEY_CLASSES_ROOT\lnkfile and HKEY_CLASSES_ROOT\piffile.
3. Delete the value IsShortcut under both these keys.
4. Close the Registry Editor and restart
Windows.

5. Speed up your modem >>>

>> Even if your modem is working well, the baud rate of your COM port might not allow you to reach top-speeds. To improve the port's speed:
1. Click Start > Settings > Control Panel >
System.
2. Under the Device Manager tab, click the '+' sign next to Ports (COM & LPT).
3. Select the port your modem uses (usually COM2), click Properties, and on the Port Settings tab set the Bits per second to 115200 bps.


6 . Adding items to send to >>

>> Send To is an option available when you right click any file in Windows. You can use this feature not only for copying or moving files, but also for quickly opening files with programs they are not associated with it. For example, you could create a shortcut to Notepad and send any ASCII text file (like .HTM files) to Notepad.
1. Browse to the \Windows\SendTo folder using Windows Explorer.
2. Right-click an empty space on the window and select New > Shortcut.
3. In the Create Shortcut window, use the Browse button to select the program or the directory for the shortcut.
4. Click Next and Finish to create the shortcut.


7. Automatic logon >>

>> If Windows asks you for a user name and password every time it is started, you can have it log on automatically:
1. Open the Registry Editor, navigate to HKEY_LOCAL_MACHINE\Software\Microsoft\Windows\Curr entVersion\Winlogon and add the following String values:
AutoAdminLogon
DefaultPassword
DefaultUserName
2. Double-click on each of them to enter their respective data. Set the value of AutoAdminLogon to 1. Enter your user name and password in the DefaultUserName and DefaultPassword items respectively.

8 .Short cut of Shutdown - Restart >>

>> It is possible to shutdown or restart Windows immediately, without waiting for a confirmation.
1. Right-click on the Desktop and click New > Shortcut.
2. In the Command line box, type 'C:\Windows\rundll.exe user.exe,ExitWindows'.
3. Click Next, name the shortcut Shutdown Windows and click Finish.
Similarly, to create a shortcut to restart, type 'C:\Windows\rundll.exe user.exe,ExitWindowsExec' for the Command line.

9. When keyboard lights aren't enough, hear the sound of locking

>> Sure your keyboard has small lights (LEDs) to indicate if your CAPS, NUM and SCROLL lock keys are on or off. When you're busy typing you might accidentally hit one of these locks which might force you to retype.

Here's how to make your computer beep whenever any of the lock keys change state:


* Go to the Control Panel

* Double click Accessibility Options

* Turn on the ToggleKeys checkbox

* Click OK

10. Renaming Desktop Icons

>> You can easily rename various Desktop (System Icons).

Click Start, Run and enter REGEDIT. Navigate to the following Registry brach:

HKEY_CURRENT_USER\Software\Microsoft\Windows\Curre ntVersion\Explorer\CLSID

The Desktop Icons are located in the sub keys as follows:

My Network Places: {208D2C60-3AEA-1069-A2D7-08002B30309D}
My Computer: {20D04FE0-3AEA-1069-A2D8-08002B30309D}
My Documents: {450D8FBA-AD25-11D0-98A8-0800361B1103}
Recycle Bin:{645FF040-5081-101B-9F08-00AA002F954E}
Default IE Icon: {871C5380-42A0-1069-A2EA-08002B30309D}

Double click the Default value in the above keys and enter the text you desire. Right click on the Desktop and select Refresh to see the changes.

To undo the changes, just right click on the Default value and select Delete. Refresh the Desktop to see that things are back to normal.

11. Remotely shutdown a computer

>> Probably the most useful trick of is being able to shut down the computers on a network.For this
create a new shortcut using right-click -> New -> Shortcut and type 'shutdown.exe -i'. Open the newly created shortcut and there you have it. You can shutdown a computer on your network or even schedule a shutdown.
Choose 'Add' and type the IP address or name of a computer on your network.

12. Change Start Menu display speed

>> I didn't bought a brand new Pentium 4 and 1 GB of RAM just to wait until Start Menu shows the menu I hover.
Open the Registry Editor by typing 'regedit' at Run (Start -> Run). Navigate to HKEY_CURRENT_USER\Control Panel\Desktop and change MenuShowDelay to a smaller value, 50 for example.

13. Customize Internet Explorer title bar

>> You may wonder... this can't be very useful. Well, you can use it to personalize computers if you are a local computer manufacturer, or personalize all the browser in your company with your company's name or your own name.Open Group Policy utility either by selecting it from Administrative Tools or using Start -> Run -> gpedit.msc. In the right side of the window navigate to User Configuration -> Windows Settings -> Internet Explorer Maintenance -> Browser User Interface and double click the 'Browser Title' item in that list. Check 'Customize Title Bars' and input the title you wish.


14. Closing Error Reporting (Win XP)

>> Error reporting, what is it and why does Microsoft want you to have it on? Basically whenever your computer crashes Win XP makes a little report of what went wrong and then sends it to Microsoft so they can improve the Windows Operating System. Generally it sounds like a nice idea, but do you really want to be sending reports about your computer to Microsoft? I personally don't and they allow you to shut off this feature. Here's how you do it:

1. Open your control panel
2. Click on Performance and Maintenance
3. Then click on System
4. Go to the Advance Tab
5. Click on the Error Reporting button at the bottom
6. Select Disable Error Reporting
7. Click the "But notify me when a critical error occurs"
8. Click Ok Twice.

You can leave out step 7, but I like my operating system to tell me when its had a major error, mainly because I can look up the cause of the error and hopefully find a solution to it on the net or at Microsoft. There you have it, error reporting to Microsoft is off and you don't have to worry about sending a report to Bill Gates.

Hope these tricks helps u in some way .

How To Limit Your Children's Access Times On A Computer

How to regulate your children's access times on a computer

If you want to regulate your children's' access times on their computer when you can't personally supervise them Windows XP provides a tool to do this.

To access this tool you must log on with an administrator account.

After you log on, use the Windows Command Prompt.

Click Start/ Programs/Accessories/Command Prompt.

At the Command Prompt type the following:

net user AccountName /times:

Replace "AccountName" with your child's Windows account name.

Finish by adding specific times to the end of the command as shown below.

These will be the times during which your child can log onto Windows as normal.

Any time not included is restricted.

You can specify a day or days along with a time range.

For example, use the following to allow computer use only on Saturdays between 9 a.m. and 5 p.m.:

net user AccountName /times:Sa,9AM-5PM

You can also specify a range of days.

For example, use the following to allow computer use Monday through Friday from 4p.m. to 10 p.m.:

net user AccountName /times:M-F,4PM-10PM

You can even set different schedules together.

For example, use the following to allow computer use Monday through Friday from 4 p.m. to 10 p.m. and on Saturdays between 9 a.m. and 5 p.m.:

net user AccountName /times:M-F,4PM-10PM;Sa,9AM-5PM

To indicate days of the week use the abbreviations M, T, W, Th, F, Sa and Su.

To indicate times, use only whole hours.

If you use multiple schedules separate each with a semicolon as in the above example.

To remove the restrictions you set use the following command:

net user AccountName /times:ALL


In combination with the above, you can use a filtering program which prevents children from accessing inappropriate web pages (or any specific pages you want to restrict).

COMPUTER TIPS AND TUTORIALS


How to burn an iso image to a cd
This tutorial will help you burn an image to a cd.

For this tutorial I will be using Nero because its the best one to use or you can use magic iso or ultra iso but for me Nero is fast. :)
If you would lke another tutorial with a different program post it here and I will be glad to help. Bare in mind that I used an old version of nero that came with my pc, but the old nero should have the same thing just better graphix

First pop in a cd to your disc drive( easiest step :thing:)( Depending on how big your iso image is you might need a dvd rom instead of a cd rom.)
(Example: 678 mb=cd rom; 2 gigs=dvd-rom, anything over 700 mbs will need a dvd-rom)

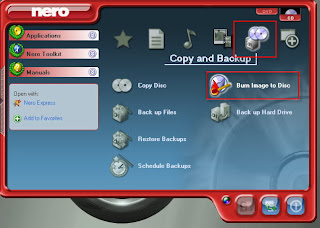
Second open up Nero:

Next go to the copy and back up icon and click on burn image to cd:
After that, you will get a window
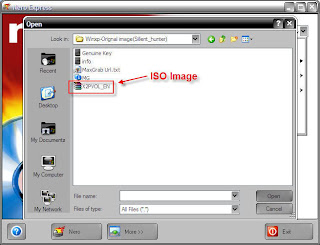
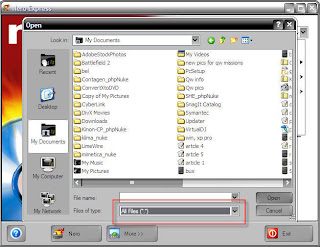
After that make sure that you change the files of type to "all files" or else you wont be able to view your iso image
Next go to the location where you have saved you iso file and click on it
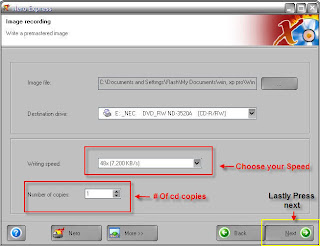
After you click on your iso image you will get a screen
hoose the options that you find reasonable and finally press next

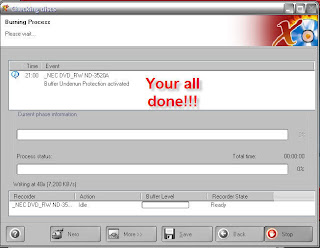
You will get a screen that looks like this indicating that your image is burning to your cd:
Finally, just wait til the process is done and you will have successfully burned an image to a cd.

LinkWithin

Related Posts Plugin for WordPress, Blogger...
Blogger Tips And Tricks|Latest Tips For Bloggers Free Backlinks